[Demo] Infrastructure as Code Deployment using Terraform
A simple introduction to IaC using terraform on AWS
![[Demo] Infrastructure as Code Deployment using Terraform](/_next/image?url=https%3A%2F%2Fcdn.hashnode.com%2Fres%2Fhashnode%2Fimage%2Fupload%2Fv1677434803779%2Fd14de103-70a5-404d-9e5e-f7ec92e6ea1f.webp&w=3840&q=75)
David is a seasoned cloud solutions architect/engineer with several years of experience architecting and building resilient, reliable and highly available systems in the cloud.
The cloud offers several ways to deploy infrastructure, one being through the management console. With the console, you can have different services up and running quickly with a few clicks. This sure is a fast way to set up an environment, but surely not the most efficient way to do so. Also as an organisation continues to grow, the organisation of projects becomes much messier using the console.
To overcome this challenge is Infrastructure as Code(IaC). With IaC, organisations can better manage their infrastructure, keep track of changes made over time, and spin up or destroy large architectures in a very short period.
There are a few options to deploy IaC on AWS including;
Cloud Formation by AWS
AWS Cloud Development Kit
3rd Party tools like Terraform, Pulumi, etc.
For our demo today, we will deploy our infrastructure using Terraform so let's get rolling.
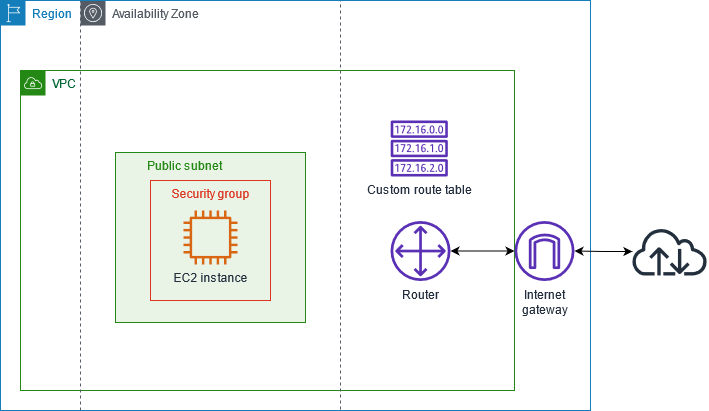
Here is the architecture diagram of our deployment
We will start by creating a main.tf file and follow the steps below to write our terraform script. Also, from your AWS account, you can recreate an access key and secret for this demo. You can click here if you would like to learn more about how to do so.
Steps:
Configure the AWS Provider: Providers are a logical abstraction of an upstream API. They are responsible for understanding API interactions and exposing resources.
 terraform {
   required_providers {
     aws = {
       source  = "hashicorp/aws"
       version = "~> 4.0"
     }
   }
 }

 provider "aws" {
   region     = var.region
   access_key = var.access_key
   secret_key = var.secret_key
 }
Here we define our AWS provider and specify the region, access_key and secret_key as variables. A better and more secure option for production systems to handle access and secret keys would be github secrets and integration with GitHub actions for automated deployments.
We create our VPC: specifying the name as test-vpc and a tag of dev
 resource "aws_vpc" "test-vpc" {
   cidr_block           = "10.99.0.0/16"
   enable_dns_hostnames = "true"

   tags = {
     Name = "dev"
   }
 }
Next is the Internet Gateway, to allow our server to talk to the internet.
 resource "aws_internet_gateway" "dev-gw" {
   vpc_id = aws_vpc.test-vpc.id

   tags = {
     Name = "dev"
   }
 }
We then go ahead to create our route table which takes the vpc id as a parameter
 resource "aws_route_table" "dev-rtable" {
   vpc_id = aws_vpc.test-vpc.id

   route {
     cidr_block = "0.0.0.0/0"
     gateway_id = aws_internet_gateway.dev-gw.id
   }

   route {
     ipv6_cidr_block = "::/0"
     gateway_id      = aws_internet_gateway.dev-gw.id
   }

   tags = {
     Name = "dev"
   }
 }
Next is the subnet for our instance deployment.
 resource "aws_subnet" "test-subnet" {
   vpc_id            = aws_vpc.test-vpc.id
   cidr_block        = "10.99.1.0/24"
   availability_zone = var.az-1

   tags = {
     Name = "dev"
   }

 }
At this stage, we can then create our route table associations.
 resource "aws_route_table_association" "a" {
   subnet_id      = aws_subnet.test-subnet.id
   route_table_id = aws_route_table.dev-rtable.id
 }
Next, we create our instance's network interface card and an elastic IP address.
 #Network interface
 resource "aws_network_interface" "net-ifc" {
   subnet_id       = aws_subnet.test-subnet.id
   private_ips     = ["10.99.1.50"]
   security_groups = [aws_security_group.test-web-sg.id]

 }

 # Create elastic IP
 resource "aws_eip" "test-eip" {
   vpc                       = true
   network_interface         = aws_network_interface.net-ifc.id
   associate_with_private_ip = "10.99.1.50"
   depends_on                = [aws_internet_gateway.dev-gw]
 }
Then finally the instance, we will also install an apache server to the instance during provisioning. We have also specified a key name for us to use to SSH into the instance
 #Create instance
 resource "aws_instance" "web-server" {
   ami                  = var.ami-ubuntu
   instance_type        = var.instance_type
   availability_zone    = var.az-1
   key_name             = var.key_name

   network_interface {
     device_index         = 0
     network_interface_id = aws_network_interface.net-ifc.id
   }
   user_data = <<-EOF
                 #!/bin/bash
                 sudo apt update -y
                 sudo apt install apache2 -y
                 sudo systemctl start apache2
                 EOF
   tags = {
     Name = "dev server"
   }
 }
Finally, we need to define the variables we have used through our code above and output the Public IP address to access our instance on a browser. You can have all these together with the main.tf file but I would prefer to have the variables in a separate file called variable.tf
 variable "region" {
   type    = string
   default = "us-east-1"
 }

 variable "az-1" {
   type    = string
   default = "us-east-1a"
 }

 variable "ami-ubuntu" {
   type = string
 }

 variable "instance_type" {
   type = string
 }

 variable "key_name" {
   type = string
 }

 variable "access_key" {
   type      = string
   sensitive = true
 }

 variable "secret_key" {
   type      = string
   sensitive = true
 }

 output "server_public_ip" {
   value = aws_eip.test-eip.public_ip
 }
Terraform deployment:
We will run a series of commands to deploy our infrastructure next. To do so, we need first to download terraform. Once downloaded, we run the following command in the CLI.
#initialising terraform
terraform init

#to validate our code ensuring there are no errors
terraform validate

#this shows the resources we are about to deploy
terraform plan

#finally provision our resources on AWS
terraform apply
Copy the Public IP address from the terminal and paste it to your browser to see the running apache server installed.
NB: You can also see your provisioned resources in the cloud formation stack. When you run terraform apply, you will be prompted to input the values for the variables you defined; however, you can specify default values, so you don't have to type it in every single time. You parse default as a parameter when defining your variable as done for the region variable.
Extra resources:
Terraform AWS provider: https://registry.terraform.io/providers/hashicorp/aws/latest
VPC with a single subnet: https://docs.aws.amazon.com/vpc/latest/userguide/VPC_Scenario1.html
AWS Cloud formation: https://aws.amazon.com/cloudformation/
AWS CDK for different programming languages: https://docs.aws.amazon.com/cdk/v2/guide/home.html
Pulumi: https://www.pulumi.com/